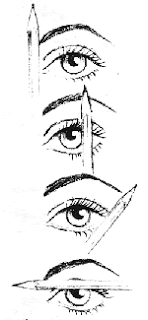
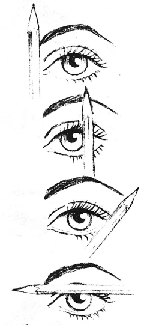
The age old question of women everywhere is "How in the world do I get my eyebrows to look great?" To the left is a great diagram to use as a guide for shaping the brow. Using an eyeliner pencil or a shadow brush handle line it up along the inside of your nose, touch your nostril and making sure it is pointing straight up and down (first illustration). Your brow should end no further in than the nostril and no further out than the inner corner of your eye, so anywhere within that area is a good rule of thumb. Mark that area with a liner pencil. Next, line the pencil up at an angle against your nostril (third illustration) to get the tail end of where the brow should end. Mark it. Then making sure your pencil is straight up and down line it up along the iris of your eye (the colored part of the eye, as in illustration two). This is where the arch should fall. Mark this as well. Next take a moment and decide on what brow shape you'd like to have. There are several brow shapes to consider:
- Round. This is a brow that is naturally more feminine looking and very soft. There are no angles, a rounded head (end near the bridge of the nose) and has a curved arch with a tapered tail.
- Angled. This is a strong brow look. Not for the faint of heart. These brow shapes tend to have a squared off head and are strongly defined with a sharp angled arch and a tapered tail.
- Soft angled. This is an angled brow but not as strong or boxy looking. A feminine brow with soft curves and a high slightly angled arch.
- Curved. This is like a soft angled or round brow with a tapered end but with an upturn at the end closest to the bridge of the nose. If the head is turned up too much this can give the wearer a faintly surprised look at all times.
- Flat. This is the most masculine and strongest brow of all the shapes. Another shape that is not for the faint of heart. These tend to be thicker and do not have a high arch at all. There is a short tapered end and a faint arch on the brow.
Don't go in there all willy nilly and expect to get a perfect brow. Consider the shape of your face, the brow shape you like best (study celebrity and model photos for an idea of different brow shapes) and draw in possible brow shapes using an eyeliner pencil. It's best to "try it on" first before you jump in there and end up with a brow shape that is extremely unflattering for your face.
If you are one of those that gets queasy at the thought of waxing or plucking your own brows but you feel as though the ladies at the salon do not listen to what shape you want, make sure you take a photo of the brow shape you like so they know exactly what shape you are going for.
If you are a plucker or waxer, then make sure to outline in white or nude liner pencil the shape you are going for and to pluck or wax anything that falls OUTSIDE of those lines. Once you've finished shaping the brow take a brow brush/comb and comb straight upwards. Trim with a pair of small scissors anything that sticks up past the brow line. This will ensure that you won't have any scragglies cropping up from a night of extensive tossing and turning on your pillow.
For a natural look, take a clear brow gel or clear mascara (my favorite is Maybelline's Great Lash mascara in clear) and comb through to set the brows. If you want a more polished or glam look then take a powder that closely matches your hair color, a stiff angled brush and either water or the brow gel and fill in the brows with the brush dampened. Follow the direction the hair grows in to get a more natural look otherwise it can look harsh.
If you follow up with a concealer to sharpen the look of the brows then please BLEND the concealer! Make sure your concealer is only a shade or two lighter than your natural skin color or it will look like a bad drag accident. I do have to say though, if your brows are groomed correctly, you should not need to use concealer unless you are going for a super dramatic sharply defined brow.
For an instant brow lift, dab a bit of light colored concealer, cream highlighter or a shimmery shadow just under the arch of the brow and the inside corner of the eyes and blend well. It will brighten your eyes AND lift the brows.

Here, I opted for a rounded shape brow. I highlighted with a shell pink under the arch and a faint shimmery nude on the corner of the eye against the bridge of the nose. Brows are filled in using a medium brown brow powder by Ardell (the same company that makes eyelashes). You can also use an eyeshadow that closely matches your hair color for brow powder as well. Revlon ColorStay has a couple of great shadow quads that closely match natural hair colors.
Whatever you do, DON'T butcher your face with bad brows. Don't be afraid to ask your Makeup Artist if they do brows or, if they don't, who they would recommend. Your makeup artist should also be able to tell you how to fill them in and shape them properly. Don't get caught with bad brows and speak up if someone messed them up. They CAN be fixed even if it is temporarily until they grow back in enough to be shaped properly. Your eyebrows are the frame of your face and if they are poorly done then even the best makeup application will suffer for it.


